Chris Padilla/Blog
My passion project! Posts spanning music, art, software, books, and more. Equal parts journal, sketchbook, mixtape, dev diary, and commonplace book.
- You may need to
pip install mysqlclientso that the ORM can pick up your mysql config. - You may also need to download mysql through homebrew.
- Lastly, I think it's helpful to have the MySQL workbench GUI.
- Tolkein's Fellowship of the Ring is going to take me a while, y'all. 🐉 So far so good, though. It's very cozy — lots of words dedicated to eating supper.
- Form & Essence: A Guide to Practicing Truth I took an arts admin class with Matt back at UT. Matt is such an amazing embodiment of the servant leader, and this book feels like I'm getting to take the best bits of his class all over again.
- I have a few words written through the Books tag on my blog. My favorite this month: Software is Measurably Valuable Creation
- My friend Thomas Kurtz gave a beautiful recital in Austin! No sound online yet, but all of his recordings are gorgeous.
- The Black Box by aivi & surasshu. An old favorite. I love the mix of classical and chiptune by the composers of Stephen Universe.
- Lumi by Snail's House. Kawaii Future Bass at it's finest.
- Brasilian Skies by Masayoshi Takanaka. The king of City Pop never disappoints. I admit that Star Wars Samba is a favorite track.
- New Ted Lasso is pretty good! The Apple product placement is strong this season. 📱
- We're trying out a few others - Shrinking and The Big Door Prize. So far so good!
- ^ beginning
- $ end
- | logical or
- [abcd] match one of these values for one character
- [a-z] match within range for one character
- Add a new order.
- Insert based on the
LAST_INSERT_ID() - Rung on the career ladder
- Platform/OS
- Code vs. Data
- Systems vs. Applications
- Business vs. IT.
Faber - Ceremony for Peace
The Faber books have a knack for really stately pieces 👑
Sorry for the fake out at the end. 🙂 Best experienced in a loop!
Connecting SQL with Python
A great deal of data flexibility is made available through MongoDB's aggregations.
When it comes to SQL, that same ability to query and combine data is a first-class process by nature of the language itself.
Combine that with a scripting language like python, and the possibilities continue to open up!
Here are the basics to getting started with passing SQL queries in from Python.
Setting Up
A bit of installing needs to be done first:
To setup mysql on the command line after install, you'll want to login with this command:
$ mysql -u root -pLeaving the password flag blank by default on first login, though this can be changed later.
SQLAlchemy & MySQL Workbench
SQLAlchemy will be the ORM of choice for this post. There are other great options, though I personally chose this because it has first class support in the Pandas method DataFrame.to_sql().
The nice thing about using an ORM is you have access to methods that simplify queries down to a single call.
#Equivalent to 'SELECT * FROM schools'
query = db.select([schools])
Sometimes, though, you have to open up the hood and write more intricate queries yourself.
Writing the Script
Ok! The fun part begins!
In an environment variable, set your connection url:
mysql+mysqldb://root:PASSWORD@localhost/DBNAMEAbove I've already created a DB, so I'm skipping that step here. You can programmatically do this through Python and the steps looking similar to create_db_connection below.
We'll pass that url into our create_db_connection method:
from sqlalchemy import create_engine
from sqlalchemy.sql import text
from sqlalchemy.orm import Session

def create_db_connection(url):
  connection = None
  try:
    connection = create_engine(url)
    print("MySQL Database Connection Successful 👍")
  except Error as err:
    print(f"Error: '{err}'")

  return connection
While we're at it, let's write our method for executing a query and reading a result:
def execute_query(connection, query):
  try:
    with connection.connect() as session:
      session.execute(query)
      print('Query Successful')
  except Error as err:
      print(f"Error: '{err}")

def read_query(connection, query):
  result = None
  try:
      with connection.connect() as session:
        result = session.execute(query)
        return result
  except Error as err:
      print(f"Error: '{err}'")
If you'd like to pass in values dynamically, you can use the text module. Here's an example form this article:
from sqlalchemy.sql import text
with engine.connect() as con:

    data = ( { "id": 1, "title": "The Hobbit", "primary_author": "Tolkien" },
             { "id": 2, "title": "The Silmarillion", "primary_author": "Tolkien" },
    )

    statement = text("""INSERT INTO book(id, title, primary_author) VALUES(:id, :title, :primary_author)""")

    for line in data:
        con.execute(statement, **line)
For us, though, a raw string works just as well:
pop_client = """
INSERT INTO client VALUES
(101, 'Starbucks', '123 Cool St., Dallas TX', 'Fast Food'),
(102, 'Cava', '27 Yum Dr., Austin TX', 'Lunch'),
(103, 'Flavor Town',  '20 W Good Food Lane, Houston TX', 'Dine In'),
"""
One reason to use MySQL workbench here is that it's WAY easier to debug through their console than to do it within our Python program. So, as you're writing queries, I would recommend giving them a whirl in the GUI first.
After confirming the above insert works in the GUI, you can clear it by truncating the table:
TRUNCATE TABLE clientFrom here, it's as easy as calling our methods:
connection = create_db_connection(url)

q1 = text("""
SELECT *
FROM client;
""")

execute_query(connection, pop_client)
results_first = read_query(connection, q1)

for row in results_first:
  print(row)
Reading and writing, done! From here, the only limits are your SQL savvy and your python chops.
AI as a Synthesis Tool
True artists create in the genre of their time. Sooooo I'm going to write about AI!
Some of the AI demos are pretty impressive!
What I've seen though, mostly, feels like playing those old point-and-click adventure games. You have to keep trying different solutions to a puzzle just to make the game happy. Similar is true with having AI generate content for you.
It's a tool, but it's not quite the "steal your job" kind of automation that's been expected. At least, from a knowledge-work perspective.
Josh Comeau makes a great point at this juncture about tasks v jobs:
My personal belief is that for the most part, working professionals will find ways to integrate this technology into their workflows, increasing their productivity and value. Certain tasks might be delegated to an AI, but not many jobs.
I appreciate that GitHub's AI product is named "Copilot." It seems more fitting and true to the nature of most AI tools. It's not going to do the job for you, but it's a means of getting an idea started or synthesizing information.
Dave and Chris speak to this point on ShopTalk Show (also, my source for Josh's article!) AI seems to be good at synthesizing and expanding on certain points. Generating reports, namely, or summarizing notes.
But, in that sense, blog articles that are only a Google search away can accomplish a similar task.
So maybe that's it. AI is largely a synthesis tool that is only one step removed from the Google "I'm feeling lucky" button of old.
But it still takes a human being to understand context, style, form, and to solve the innumerable problems that take more than a few Google searches.
Does that takeaway from how impressive or useful AI is as a tool? I don't think so. AI still unloads the initial effort of sifting through content.
If anything, the fact that AI is not quite a quantum leap in productivity is a testament to how AMAZING our current resources are.
The Haps - April 2023
The sun is coming back out and I am loving it! ☀️
Blogging & Dev
Fun month of blogging! I'm wrapping it up on researching JavaScript testing and am switching over to SQL.
Tailwind redesign is still kicking at work! We got docker up and running, too! 🐳
Meetups are great! I had a blast again at React Dallas! If you're in the area, come on out! It's such a great group of folks. ⚛
You can catch up with my tech projects through the Tech tag on my blog.
Music
I released Whiteout this month! Snuck it in right as it started warming up outside.

On a trip up to UNT, I got to wander around my old stomping grounds at the College of Music. It was so rejuvenating to be up there. I lovingly wax nostalgic on the place as "my own Disney World for Music."
I did a few piano recordings while I was there, too! The Bach Prelude in C is my favorite, such a dreamy piece...
You can see what I've shared so far through the Music tag on my blog. I'm also sharing recordings on Instagram.
Drawing

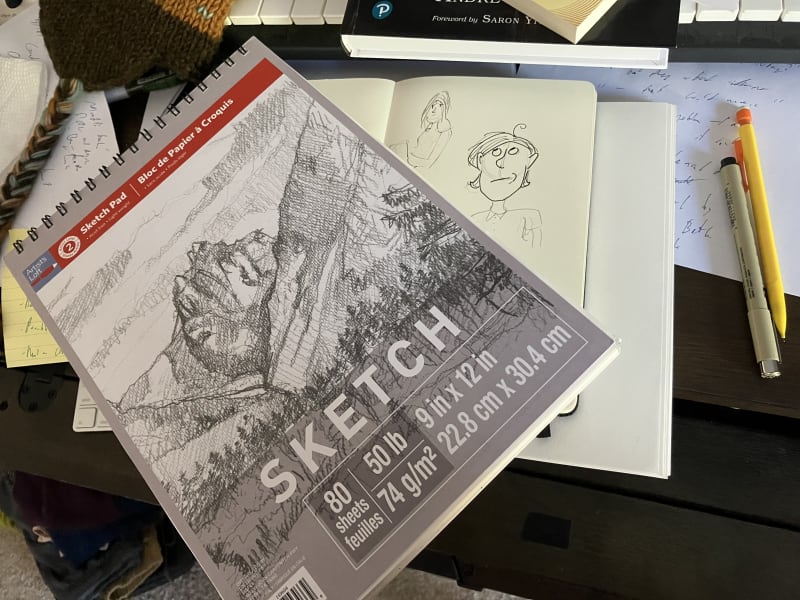
I finished my second AND third sketch books this month! 📒 Dried out my first fine liner! 🖊 I'm crossing right through those artistic rights of passage.
I'm just about wrapping up Drawabox with lots of studies on animals. I'm currently on the hunt for resources for studying the human figure next.
You can see what I've made so far through the Art tag on my blog. I'm also sharing drawings on Instagram.
Words and Sounds
📚
🎧
📺
Life
Really grateful for some sunshine and warmth! The end of winter is always pretty tough, and this one felt extra long here in Dallas.
It's mostly been heads down for Miranda and I. My favorite nights this month have been the couple where we've put on some music and drawn together.
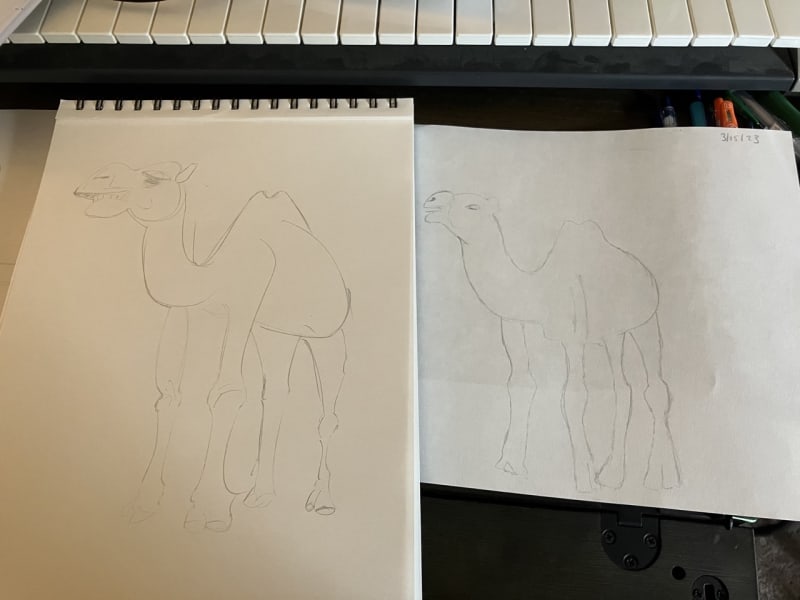
The best vibe was when we drew camels and snails while listening to Arooj Aftab! 🐌 🐫
👋
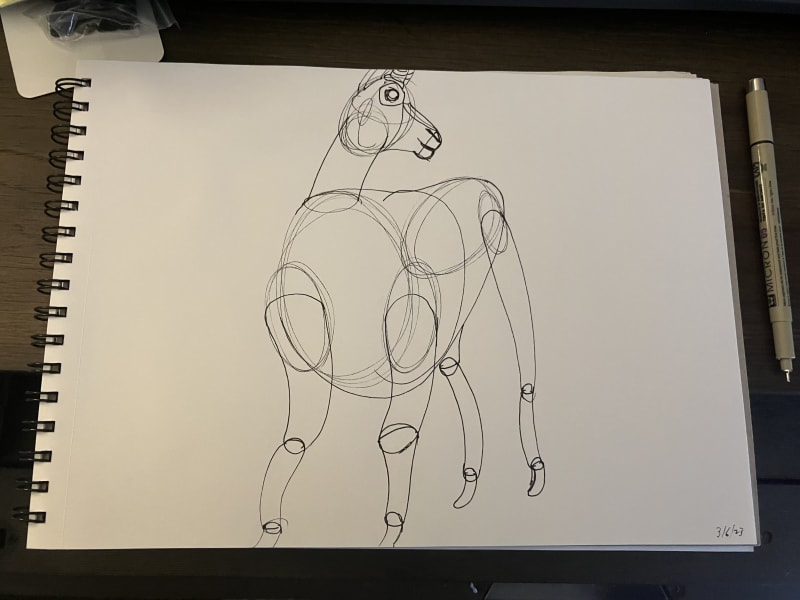
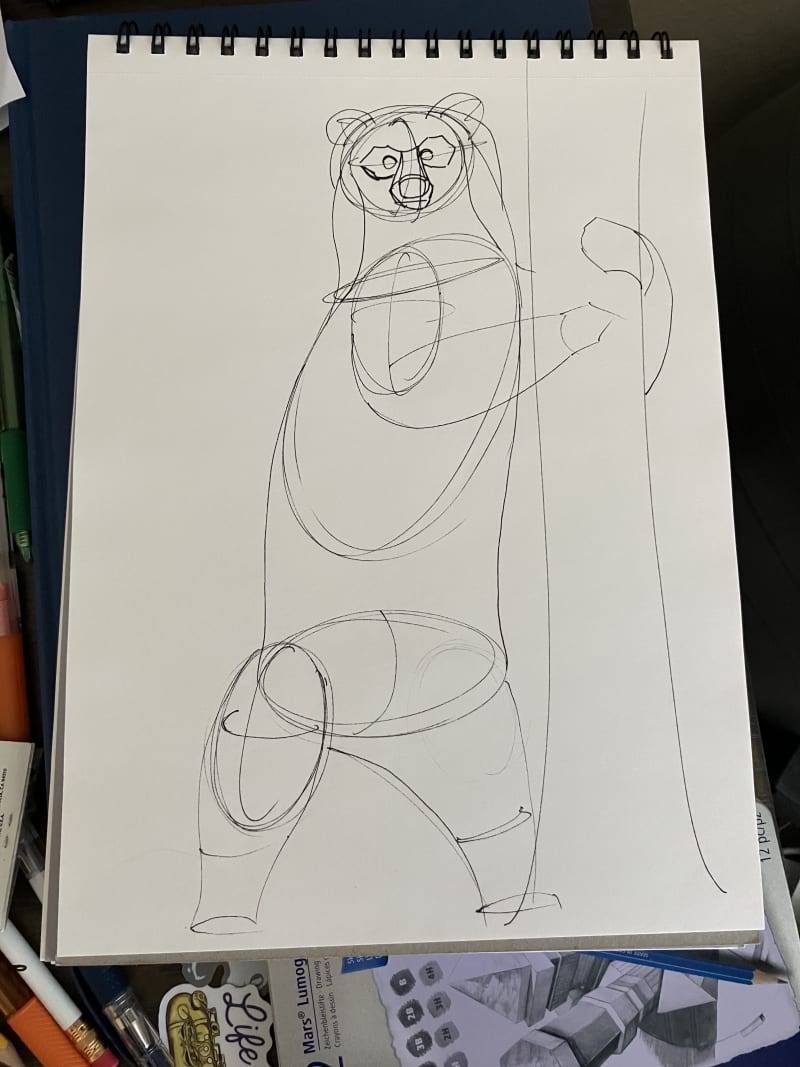
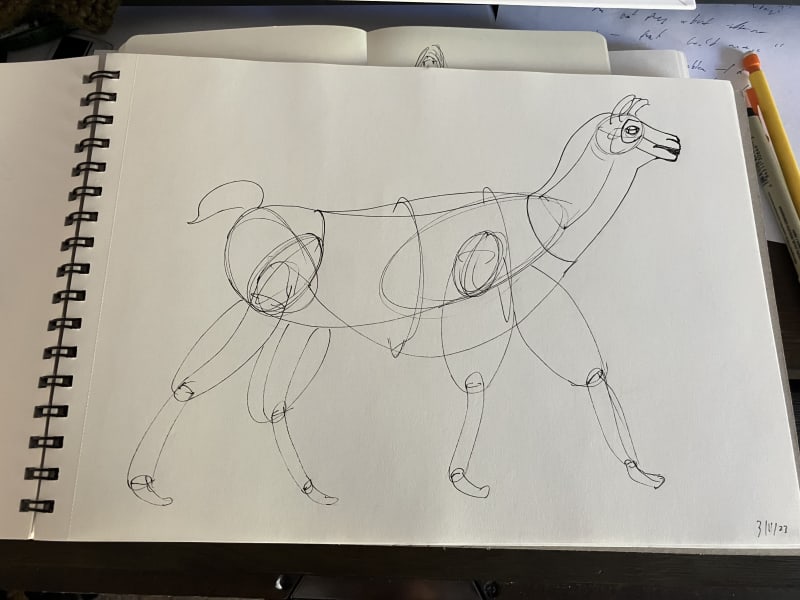
Animal Construction
My favorite studies on animal construction! Lots of sturdy looking body with noodley legs! 🍜
All part of the Drawabox module on animals.

Faber - Wild Flowers
Many Pots Boiling
Focus is a really big deal.
Minimalism is a movement to live with only what's essential, Essentialism and The One Thing, and 4,000 Weeks are books about honing in on only what's most important. Speaking as a former musician, there are even cultural precedents to go all in on whatever you are most passionate about.
But bouncing around and chasing lots of interests is way more fun!
W.A. Mathieu writes beautifully on this in The Listening Book:
It is valuable to have many pots on many burners, and to keep track of the pots and the fires under them. This means that it is good to nurture diverse musical interests with well-defined, coherent projects in which to develop them... On any given day, go for whatever is cooking best—stir that pot. One's interest boils and cools unpredictably. Don't hassle it. Be responsive to your muse, not controlling. Do what she says. Coherence will come over time.
Call it productive procrastination, if you'd like.
It's what keeps your spirit creating. The important thing in making things is not really the product, it's the process. With too much focus, the process can become heavy. With variety, there's likely always something you'll want to chase after in another craft when the current one simmers down.
For Bowie, it was a dance between painting and songwriting. For me personally, well, I have a lot of options! Drawing, piano, guitar, coding, blogging, writing music. They feed each other beautifully.
If you have one big thing, great! I hope you find time for a bit of exploration, too. Magic happens, there!
The Blue of Distance
I think often about Rebecca Solnit's essay "The Blue of Distance". The full piece is linked there, and deserves a dedicated read for the beautiful illustrations on her theme. The core message is this:
We treat desire as a problem to be solved, address what desire is for and focus on that something and how to acquire it rather than on the nature and the sensation of desire, though often it is the distance between us and the object of desire that fills the space in between with the blue of longing. I wonder sometimes whether with a slight adjustment of perspective it could be cherished as a sensation on its own terms, since it is as inherent to the human condition as blue is to distance? If you can look across the distance without wanting to close it up, if you can own your longing in the same way that you own the beauty of that blue that can never be possessed? For something of this longing will, like the blue of distance, only be relocated, not assuaged, by acquisition and arrival, just as the mountains cease to be blue when you arrive among them and the blue instead tints the next beyond. Somewhere in this is the mystery of why tragedies are more beautiful than comedies and why we take a huge pleasure in the sadness of certain songs and stories. Something is always far away.
Any creative practice is made all the more fulfilling because of this effect. What James P. Carse would call an infinite game, music and illustration and software and writing are all fulfilling because the horizon is always moving. There's not necessarily a mountain to climb so much as there are valleys to explore.
Funnily enough, it's easy to get caught up in reaching the destination anyway. Wanting to finish an album, wanting to be able to draw with a certain technique and style. That's not even considering the external factors - wanting to make X amount of money, have X followers.
After "having arrived" at a few intended destinations, I can wholeheartedly confirm that it's "being en route" that is life-giving.
Matt Hinsley in Form & Essence writes about "The Law of Dynamicism" The idea is that we are always stepping towards the horizon. Matt encapsulates how that distance energizes the work at hand:
I am working right now to write this book... In an earlier time I might have said something like, 'I can't wait to finish this book.'... But the reality is...that reality is. I will be then as I am now. Wherever I go, there I am. Today is my perfect day because I am thinking, learning, feeling, breathing, communicating, deepening. When this book is done, there will be another to write, or perhaps a different sort of adventure altogether. But what that is, is insignificant. It will be only another marker along the path in my lifetime of glorious dynamic consciousness.
Ren'Py v Making a Game with React
Have you ever wanted to make a game? Is it a visual novel?! You could do what I did and use web tech to build the game from scratch. OR you could use Ren'py!
We made AC New Muder in React, Node, and Sanity. I learned a TON, and I'm a better developer for having done it!
But, I am tempted to daydream about what it would have been like to lean on an actual game making tool.
As far as I can tell, you barely even need to know Python to get started! Here's what a script looks like from the docs:
define s = Character('Sylvie', color="#c8ffc8")
define m = Character('Me', color="#c8c8ff")

label start:

    s "Hi there! How was class?"

    m "Good..."

    "I can't bring myself to admit that it all went in one ear and out the other."

    s "Are you going home now? Wanna walk back with me?"

    m "Sure!"
We actually considered using this at the start. What stopped us ultimately though was flexibility. I think an interactive map, item storage, and health were not a part of the scope of a tool like this.
AND, we wanted it to be on the web!! Ren'py has great Windows support, potentially less Mac support. For our case: having to download a game like this, launching it on Steam — that would be complicated since our game is based on Nintendo's characters. We wanted an early 2000's flash games feel. We both have a VERY soft spot for those games!
So, it's nice to dream. Maybe next time! But I'm really grateful we used the web platform.
SQL Cheat Sheet
I've been picking up SQL! I wanted to take my MongoDB experience and see what some of that database querying would look like in the world's most popular database querying language.
Not a very narrative write up, but maybe some of these will help pull back the curtain on what SQL looks like!
Notes are courtesy of this introduction to MySQL.
Arithmetic
When selecting, you can do arithmetic on integers. You can also give them alias's with the AS clause:
USE sql_store;

SELECT
    first_name,
    last_name,
    points,
    points * 10 + 100 AS "discount factor"
FROM customers
-- WHERE state = 'FL'
ORDER BY first_name
You can edit the data returned and apply the changes. Neat!
SELECT DISTINCT state returns only the unique values with no repeating values
USE sql_store;

SELECT name, unit_price, ROUND(unit_price * 1.1, 2) AS "New Price"
FROM products
<> is the same as !=
single or double quotes work.
not case sensitive with strings.
Query by date
USE sql_store;

SELECT *
FROM orders
WHERE YEAR(order_date) >= YEAR(CURDATE()) - 5
Order of ops in logic operators:
AND goes first. then OR
IN and NOT
USE sql_store;

SELECT *
FROM Customers
WHERE birth_date > '1990-01-01' OR points > 1000 AND
    state NOT IN ('VA', 'GA', 'FL')
BETWEEN
USE sql_store;

SELECT *
FROM customers
WHERE birth_date BETWEEN '1990-01-01' AND '2000-01-01'
LIKE operator
USE sql_store;

SELECT *
FROM customers
WHERE last_name LIKE 'b__y'
-- % any number of characters
-- _ single character
USE sql_store;
SELECT *
FROM customers
WHERE phone LIKE '___-___-___9' AND
address LIKE '%Trail' OR
address LIKE '%Avenue'REGEXP
Special characters:
USE sql_store;

SELECT *
FROM customers
WHERE last_name REGEXP 'b[ru]'
IS NULL
USE sql_store;

SELECT *
FROM orders
WHERE shipped_date IS NULL
Joins
Inner Join: The basic. We're starting from orders and we're pulling in the other table
USE sql_store;

SELECT order_id, first_name, last_name, o.customer_id
FROM orders o
JOIN customers c
    ON o.customer_id = c.customer_id
We're also giving an alias to orders and customers as o and c. Nice!
Another example:
USE sql_store;

SELECT order_id, p.product_id, name, quantity, p.unit_price
FROM order_items oi
JOIN products p
    ON oi.product_id = p.product_id
Join across DB's
Not hard...
USE sql_store;

SELECT *
FROM order_items oi
JOIN sql_inventory.products p
    ON oi.product_id = p.product_id
Self Join
USE sql_hr;

SELECT e.first_name, e.last_name, m.first_name as manager_first_name, m.last_name as manager_last_name
FROM employees e
JOIN employees m
    ON e.reports_to = m.employee_id
Joining Multiple Tables
USE sql_store;

SELECT *
FROM orders o
JOIN customers c
    on c.customer_id = o.customer_id
JOIN order_statuses os
    ON os.order_status_id = o.status
Great visual explanation of Inner and outer joins, with the ven diagram visual. √
Inner and Outer Joins SQL Examples and the Join Block
Inner join - You're getting only the intersections between the tables
Outer joins - you are including one full table plus the intersecting data. A left join includes all the customers, along with their order details. A right join gets the same result as the inner join if you're selected table is the left one.
USE sql_invoicing;

SELECT
    pm.name as payment_method,
   c.name as client_name,
   date,
   amount
FROM payments p
JOIN payment_methods pm
    ON p.payment_method = pm.payment_method_id
JOIN clients c
    ON p.client_id = c.client_id
Compound Join Conditions
order_items has a compound key. Meaning, the unique identifier here is not a single id, but is in fact the combination of two id's from other tables.
Why not use a unique id here? Are there benefits to that? Shouldn't all tables have unique ids?
Well, regardless, here's how you handle it:
SELECT *
FROM order_items oi
Implicit Join
SELECT *
FROM orders o, customers c
WHERE o.customer_id = c.customer_id
Same as what we've been writing above. Not recommended, because leaving out will return a cross join.
Outer Joins
SELECT
    c.customer_id,
    c.first_name,
    o.order_id
FROM customers c
LEFT JOIN orders o
    ON c.customer_id = o.customer_id
ORDER BY c.customer_id
SELECT
c.customer_id,
c.first_name,
o.order_id
FROM customers c
RIGHT JOIN orders o
ON c.customer_id = o.customer_id
ORDER BY o.order_idSELECT
oi.product_id,
name,
oi.quantity
FROM products p
LEFT JOIN order_items oi
ON oi.product_id = p.product_idMultiple tables:
USE sql_store;

SELECT
    c.customer_id,
    c.first_name,
    o.order_id,
    sh.name as shipper
FROM customers c
LEFT JOIN orders o
    ON o.customer_id = c.customer_id
LEFT JOIN shippers sh
    ON o.shipper_id = sh.shipper_id
Note: Avoid right joins. Right joining can lead to complex, hard to understand queries.
SELECT
    o.order_date,
    o.order_id,
    c.first_name,
    s.name,
    os.name as order_status
FROM orders o
JOIN customers c
    ON o.customer_id = c.customer_id
LEFT JOIN shippers s
    ON o.shipper_id = s.shipper_id
JOIN order_statuses os
    ON o.status = os.order_status_id
ORDER BY order_status, o.order_id
Self Outer Joins
SELECT *
FROM employees e
LEFT JOIN employees m
    ON e.reports_to = m.employee_id
In this case, this query will include the manager that we are requesting.
USING
LEFT JOIN shippers sh
    ON o.shipper_id = sh.shipper_id

-- SAME AS

JOIN shipers
    USING (shipper_id)
Easier to write if the ids match!
Works for matching multiple columns, too
SELECT *
FROM order_items oi
JOIN orde_item_notes oin
    USING (order_id, product_id)
SELECT date, c.name as client, amount, pm.name as credit_card_name
FROM payments p
JOIN clients c
USING (client_id)
JOIN payment_methods pm
ON p.payment_method = pm.payment_method_idNatural Joins
Easier to code, but not recommended.
Joins tables based on the columns that match.
SELECT *
FROM orders o
NATURAL JOIN customers c
Cross Joins
Between two tables, shows all possible combinations for all rows in the two tables.
Colors: red blue green
size: s m l
Res:
red s blue s green s red m blue m green m etc...
SELECT *
FROM customers c, orders o
OR
SELECT *
FROM customers c
CROSS JOIN orders o
Prefer the explicit syntax
Union
SELECT
    order_id,
    order_date,
    'Active' AS status
FROM orders
WHERE order_date >= '2019-01-01'
UNION
SELECT
    order_id,
    order_date,
    'Archived' AS status
FROM orders
WHERE order_date < '2019-01-01'
Can combine records from multiple queries!
Columns that you return should be equal. Otherwise, you will get an error. This will error:
SELECT first_name, last_name -- cause of the error
from customers
UNION
SELECT name -- only one column here
FROM shippers
Inserting a Row
One way, if using all columns:
INSERT INTO customers
VALUES (
    DEFAULT,
    'Chris',
    'Padilla',
    '1922-01-01',
    DEFAULT,
    'address',
    'city',
    'TX',
    DEFAULT
)
If explicitly defining columns
INSERT INTO customers (
    first_name,
    last_name,
    birth_date,
    address,
    city,
    state
)
VALUES (
    'Chris',
    'Padilla',
    '1922-01-01',
    'address',
    'city',
    'TX'
)
INSERTING multiple rows
INSERT INTO products (name)
VALUE ('Chris'),
    ('Jenn')
Inserting Hierarchical Rows
Parent > Child relationships. One parent can have multiple children...
INSERT INTO orders (customer_id, order_date, status)
VALUES (1, '2023-03-27', 1);

INSERT INTO order_items
VALUES
    (LAST_INSERT_ID(), 1, 1, 2.00),
    (LAST_INSERT_ID(), 2, 1, 4.00)
Copying a table...
CREATE TABLE orders_archived AS
SELECT * FROM orders -- Sub query - queries for use in another query
You have to set your primary key and AI column....
Using conditional select statement as a subquery
INSERT INTO orders_archived
SELECT *
FROM orders
WHERE order_date < '2019-01-01'
CREATE TABLE invoices_archive AS
SELECT
i.invoice_id,
c.name,
i.invoice_total,
i.payment_total,
i.invoice_date,
i.due_date,
i.payment_date
FROM invoices i
JOIN clients c
USING (client_id)
WHERE payment_date IS NOT NULLUpdating a row
UPDATE invoices
SET payment_total = 10, payment_date = "2023-03-27"
WHERE invoice_id = 1
Using variables in your SET... you can use other fields to make updates like so:
UPDATE invoices
SET
    payment_total = invoice_total * 0.5,
    payment_date = due_date
WHERE invoice_id = 3
Updating multiple rows
Uses the same syntax. MySQL specifically has a safe mode that prevents updating multiple rows. You can turn it off by unticking "Safe Updates" in the preferences. You may have to restart MySQL after The IN clause can be handy, too.
UPDATE invoices
SET
    payment_total = invoice_total * 0.5,
    payment_date = due_date
WHERE client_id IN (3, 4)
Using Subqueries in an Update Statement
Fun fact - you can select part of your SQL doc to run a script
UPDATE invoices
SET
    payment_total = invoice_total * 0.5,
    payment_date = due_date
WHERE client_id =
    (SELECT client_id
    FROM clients
    WHERE name = 'Myworks')
Use the IN operator for multiple values:
UPDATE invoices
SET
    payment_total = invoice_total * 0.5,
    payment_date = due_date
WHERE client_id IN
    (SELECT client_id
    FROM clients
    WHERE state IN ('CA', 'NY'))
Good practice: Select your query BEFORE you run an update statement on your DB
UPDATE orders
SET comments = 'GOLD'
-- SELECT *
-- FROM orders
WHERE customer_id IN (
    SELECT customer_id
    FROM customers
    WHERE points >= 3000)
Deleting Rows
DELETE FROM invoices
WHERE client_id = (
    SELECT client_id
    FROM clients
    WHERE name = 'Myworks'
)
Generalizing in Software
It's tempting early on to strongly associate with the tools you're using day in and day out. I feel really comfortable with React, so at time's I've thought of myself purely as a front end guy or a React guy or a JavaScript guy.
Ultimately, though, the people you serve need someone who is more versatile. Not that job titles matter, but the gig is typically "Software Engineer," not "React Dev."
As you develop, your problem solving abilities and sensitivity to creating systems transcends and particular tool. That's where the fun problem solving is, anyway. The tool is just a vehicle for speaking with the computer.
Chad Fowler in The Passionate Programmer makes a great case for this:
It's not about where you sit on the perceived value chain of project work (where the architects holds the highest spot of royalty). It's about how generally useful you make yourself...
To visualize what it means to be a generalist, it can help to dissect the IT career landscape into its various independent aspects. I can think of five, but an infinite number exists...:
So many great dimensions through this lens. Platform/OS is a particularly juicy one. Full stack web dev can be balanced with mobile or desktop development. Developer and designer is another fun one, unsurprisingly common for front end developers.
The last point, especially, is worth noting. If you're with a startup ,the company is small enough where individual entrepreneurship and creativity play just as big a role as your technical skills.
Thankfully, the work is more fulfilling when you lean into generalizing.
Finishing Sketchbook No. 3
Another one down!! This one I picked up so I could have more room to explore compared to my little moleskin.
It started out with figure drawing dissections:
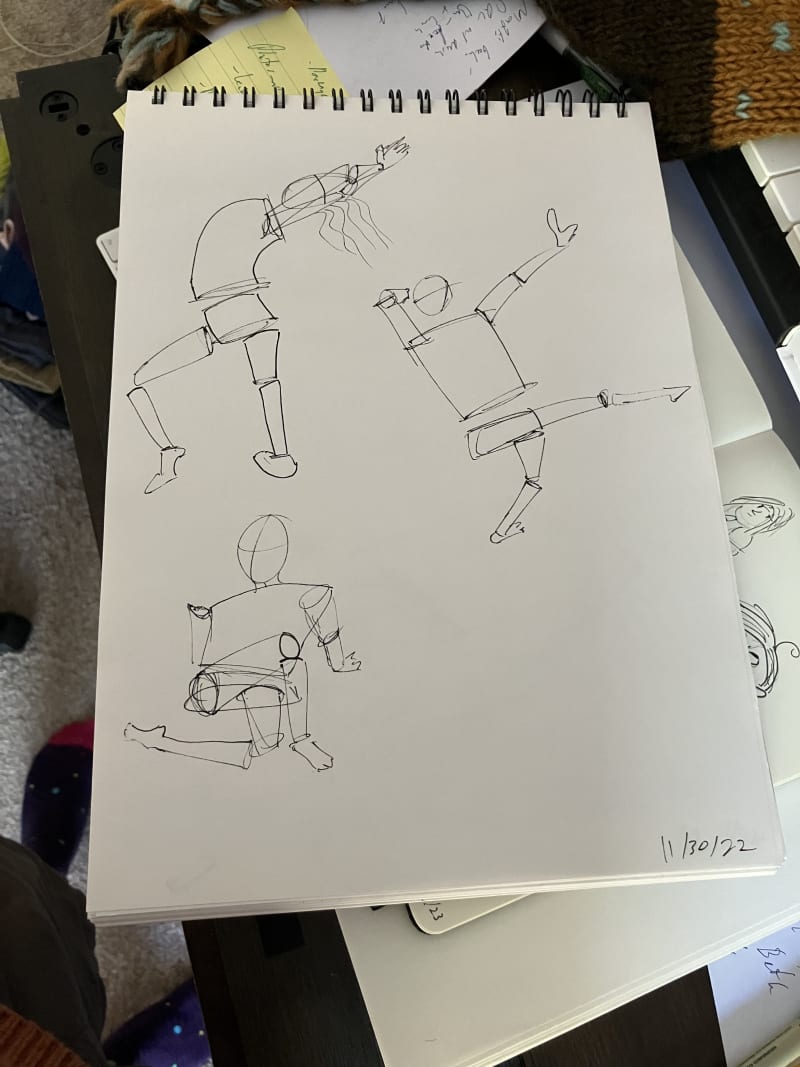
And ended with animal construction studies:
Bach - Prelude in C
So dreamy...
I was visiting UNT recently for old times sake and made it into a practice room with a baby grand!! So much fun!
Did I help someone today?
"Did I help someone today?"
Let me borrow from Simon Sinek's Golden Circle Model for a second: Why, how, and what.
At the end of the day, the bottom line is no small line in business. KPI's are a target to keep an eye on. Performance metrics and weekly outputs are something to continue monitoring. The "what" matters.
In the trenches, tools do matter. The systems we chose to implement, the ways we refactor our code, the time spent experimenting with a new technology. The "how" matters.
What matters most is certainly the "why" of helping someone.
Everything else almost feels like bike shedding when the question "Did I help someone today?" is the main guide.
Software is pretty expansive when it comes to this question, too!
Some days, that answer is "I helped a coworker debug a problem that's been slowing them down for weeks!" A deep and impactful day!
Some days, it's "I released a feature that will be used by thousands of people!" A broad impact sort of day.
The nice thing is, even on "low productivity days," we can answer affirmatively to that question in some dimension, if we're genuine.