Chris Padilla/Blog
My passion project! Posts spanning music, art, software, books, and more. Equal parts journal, sketchbook, mixtape, dev diary, and commonplace book.
- Open my repo in VS Code
- Load in any environment variables
- Start the local server
- Open up chrome
- Visit localhost:3000
- Let me listen to references.
- Let me score study a few of them.
- Let me spend 15 minutes sounding bad in a musical mode until I find a melody I like,
- Let me find an instrument that matches the sound in my head.
- Let me try adding this other instrument. Woops! That doesn't fit. Let me try another
- I want to transition key centers to the subdominant. How can I do that AND make my listeners feel a sense of bewilderment and magic as I do that.
- Consistency of dependencies (namely, node versions in web development)
- Easy onboarding for new devs
- To install an OS
- Install your runtime (Node, Python, etc)
- Upload you app directory
- Initialize the run command
- Finished Terry Pratchett: A Life With Footnotes - Rob Williams
- Still Reading Pyramids - Terry Pratchett
- Fellowship of The Ring is next! I've never read Tolkein's trilogy, should be fun!
- One off of Level by Disasterpeace. An oldie, but a goodie.
- Ape Escape OST. I've never played it, but it's a blast! 🐒
- Meditation Bells by Baldor and the Euclidean Functions. My current step-in for Chill Lo-fi beats to study to.
- 🏎 ティアーズ・オブ・ザ・スター by CASIOPEA. Such a journey. The guitar playing. 👌
- Ravel's Daphnis et Chloe ✨
- I'm rendering
CartItemFormwith React Testing Library - I'm simulating user interaction by selecting a spice level in the form.
- I'm clicking the submit button
- I'm asserting if handleSubmit has been called and if it has certain values.
- A passing test ✅
- More flexible, organized code ✅
- Bonus: I can more confidently refactor later, knowing I have tests in place 💯
- Testing allows for a clear explanation of what consumers of your code can expect. Rebekah says this is like documentation, but even better! Tests will actually verify that the code does what it says it will, unlike documentation.
- Testing allows you to write methodically. Writing the code is easy once you've written the expectations. This is further validation for testing as a process of clear thinking. Put another way: Measure twice, cut once.
- Testing old code illuminates tight coupling. Much of the talk is diving into an example of a long file of entangled responsibilities. Server requests, rendering data, managing state, all in one function. When you sit down to write a test for this, the coupling is quickly illuminated.
Creativity as Conversation
Matthew Hinsley's Form & Essence quotes William Stafford's "A Way of Writing" —
A writer is not so much someone who has something to say as he is someone who has found a process that will bring about new things he would not have thought of if he had not started to say them. That is, he does not draw on a reservoir; instead, he engages in an activity that brings to him a whole succession of unforeseen stories...For the person who follows with trust and forgiveness what occurs to him, the world remains always ready and deep, an inexhaustible environment, with the combined vividness of an actuality and flexibility of a dream. Working back and forth between experience and thought, writers have more than space and time can offer. They have the whole unexplored realm of human vision.
There is no certainty when you sit down to write. That's the magic! It's simultaneously a daunting aspect of the process as much as it is the whole spiritual point of doing it in the first place!
While explaining the importance of letting go of certainty in creative process, Matt shares this:
Have you had a good conversation recently? Did you say something interesting, profound even?...If you did, I can almost guarantee that you were accessing your creative self. And I will also suggest that there's no way you could have given that advice, in that way, had you not been having that conversation. It was in the act of conversing, or reacting to energy and idea, that you put thoughts and experiences swirling in your subconscious together into words that became concrete statements in Form as they exited your mouth.
An anecdote to the blank page then is to make the creative process something other than closing the door, turning off the lights, and staring at a blank page. But instead, a conversation.
I've been in a rut with writing music. I haven't been brining reference into my practice. I've been sitting at the keyboard and simply waiting for what comes out. While there's an intuition that's part of the process, the energy is muted when starting this way.
But nothing kick-starts writing music better than listening to something I love, and then wanting to play around with it in my own way. In the same way that visual artists aren't cheating when they draw from reference, it's quite the opposite - the music is more buoyant and fun when it's in conversation with other recordings and musicians.
This conversation-style of creating is baked into the culture of blogging! Much of blogging is finding something you read that was interesting, then adding your own two cents while connecting it to a particular audience. You're adding your own story to the mix, telling the original author's tale in a way that adds a new dimension, compounding it's message, and creating a new audience for the source material.
Creatively conversing turns wonder into art.
Starting a Development Environment from the Command Line
I have a need for speed when developing. That goes for starting up all of my development applications.
Here's what needs to happen before I start coding:
A short list. But it takes a few key strokes and mouse clicks to get there. I think I can do better!
Linux Alias Commands are the answer.
I have a few set up for a few different use cases. Here's the one the runs the recipe for the steps above:
alias cap="cd /Users/cpadilla/code/my-repo && code . && open http://localhost:3000 && source settings.sh && npm run devI'm adding this to my .zshrc file at the root of my account.
That turns all five steps into one:
$ capAnother use case: I keep a list of todos in markdown on my computer. Files are named by the current date. I could do it by hand every time, but there's a better way:
alias dsmd="touch $(date +%F).md && open $(date +%F).md"
alias todo="cd /Users/cpadilla/Documents/Todos && dsmd"
There we go! $(date +%F) is a command for delivering a specific date format. The todo alias navigates to the correct folder and then uses dsmd to create and open the file.
Small quality of life changes! They add up when you do the same commands every day. 🙂
Integration Testing with Redux
I'm testing a form on an e-commerce app. I've already looked at testing the components that add an item to the cart. Now I need to setup a test for updating an item in the cart.
My app leans on Redux to store the cart items locally. As per the React Testing Library Guiding Principles, I'm going to be asserting my app's functionality by checking what shows in the DOM against my expectations. Notably: I'm doing this instead of asserting the redux store state. I'll also be integrating a test store and provider in the mix.
The "how" today is Redux. The principle, though, is that if you're using a datastore, cache, or any other source, you want to be integrating it in your tests and not simply mocking it. That goes for either app state management or the data layer.
Mocking
In my app, to accomplish this, I have to render the whole page with the Layout component included:
  const rendered = renderWithProviders(
    <Layout
      children={
        <CartItemPage
          item={chipsAndGuac}
          itemID={'5feb9e4a351036315ff4588a'}
          onSubmit={handleSubmit}
        />
      }
    />,
    { store }
  );
For my app, that lead to mocking several packages. Here's the full list:
jest.mock('uuid', () => ({
  v4: () => '',
}));

jest.mock('next/router', () => {
  return {
    useRouter: () => ({
      query: {
        CartItemID: '5feb9e4a351036315ff4588z',
      },
      push: () => {},
      events: {
        on: () => {},
        off: () => {},
      },
    }),
  };
});

jest.mock('@apollo/client', () => ({
  useQuery: () => ({
    data: { itemById: { ...chipsAndGuac } },
  }),
  useLazyQuery: () => ['', {}],
  useMutation: () => ['', {}],
  gql: () => '',
}));

afterEach(() => {
  cleanup();
});

jest.mock(
  'next/link',
  () =>
    ({ children }) =>
      children
);`
I'm not testing any of the above, so I'm not sweating it too much. It did take some doing to get the right format for these, though.
Redux Testing Utilities
You'll notice that my render method was actually renderWithProviders. That's a custom utility method. The Redux docs outline how you can set this up in your own application here.
That's it! That's the magic sauce. 🥫✨
The philosophy behind it is this: You don't need to test Redux. However, you do want to include Redux in your test so that you have greater confidence in your test. It more closely matches your actual environment.
You can take it a step further with how you load your initial state. You could pass in a custom state to your initStore() call below. But, a more natural would be to fire dispatch calls with the values you're expecting from your user interactions.
Here I'm doing just that to load in my first cart item:
test('<CartItemPage />', async () => {
  const formExpectedValue = {
    cartItemId: '5feb9e4a351036315ff4588z',
    id: '5feb9e4a351036315ff4588a',
    image: '/guacamole-12.jpg',
    name: 'Guacamole & Chips',
    price: 200,
    quantity: 1,
    selectedOptions: {
      spice: 'Medium',
    },
  };

  const store = initStore();
  store.dispatch({
    type: 'ADD_TO_CART',
    payload: {
      ...formExpectedValue,
    },
  });

  . . .

}
From there, you're set to write your test. That's all we need to do with Redux, from here we'll verify the update is happening as it should by reading the values in the DOM after I click "Save Order Changes."
The details here aren't as important as the principles, but here is the full test in action:
test('<CartItemPage />', async () => {
const formExpectedValue = {
cartItemId: '5feb9e4a351036315ff4588z',
id: '5feb9e4a351036315ff4588a',
image: '/guacamole-12.jpg',
name: 'Guacamole & Chips',
price: 200,
quantity: 1,
selectedOptions: {
spice: 'Medium',
},
};
const handleSubmit = jest.fn();
const store = initStore();
store.dispatch({
type: 'ADD_TO_CART',
payload: {
...formExpectedValue,
},
});
const rendered = renderWithProviders(
<Layout
children={
<CartItemPage
item={chipsAndGuac}
itemID={'5feb9e4a351036315ff4588a'}
onSubmit={handleSubmit}
/>
}
/>,
{ store }
);
const pageTitleElm = await rendered.findByTestId('item-header');
expect(pageTitleElm.innerHTML).toEqual('Guacamole & Chips');
const customizationSection = await rendered.findByTestId(
'customization-section'
);
const sectionText = customizationSection.querySelector(
'[data-testid="customization-heading"]'
).innerHTML;
expect(sectionText).toEqual(chipsAndGuac.customizations[0].title);
const spiceOptions = await rendered.findAllByTestId('option');
const firstOption = spiceOptions[0];
expect(!firstOption.className.includes('selected'));
fireEvent.click(firstOption);
const updateCartItemButtonElm = await rendered.findByTitle(
'Save Order Changes'
);
expect(firstOption.className.includes('selected'));
fireEvent.click(updateCartItemButtonElm);
const cartItemRows = await rendered.findAllByTestId('cart-item-row');
const firstItemElm = cartItemRows[0];
const firstItemTitle = firstItemElm.querySelector(
'[data-testid="cart-item-title"]'
);
const customizationElms = firstItemElm.querySelectorAll(
'[data-testid="cart-item-customization"]'
);
expect(firstItemTitle.innerHTML).toEqual('1 Guacamole & Chips');
const expectedCustomizations = ['Mild'];
expect(customizationElms.length).toEqual(expectedCustomizations.length);
customizationElms.forEach((customizationElm, i) => {
expect(customizationElm.innerHTML).toEqual(expectedCustomizations[i]);
});
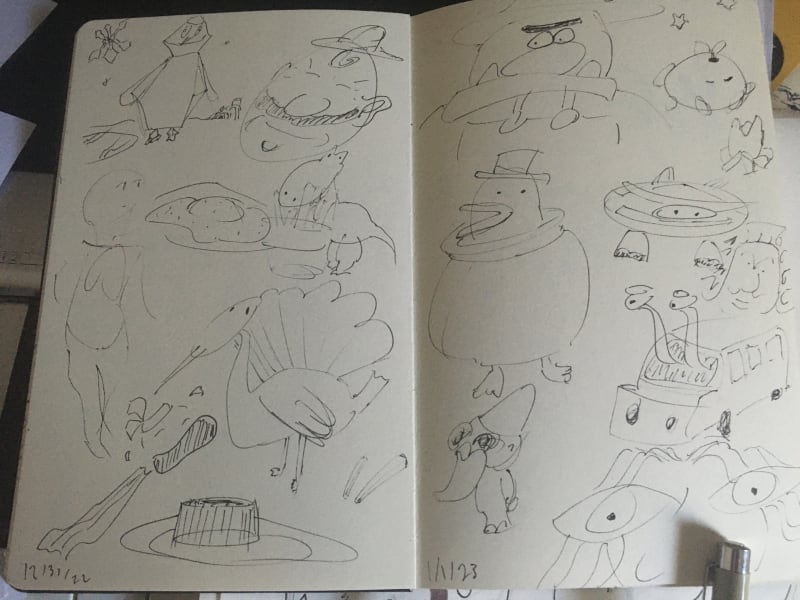
});Finishing Sketchbook No. 2
Another sketchbook down!!
This go-round, I alternated pages with two kinds of drawing. One page of drawing from imagination (visual journaling, as I've thought of it.) The other pages studies, largely older pieces by Louie Zong. What can I say, I love his work!
Here's where I started:
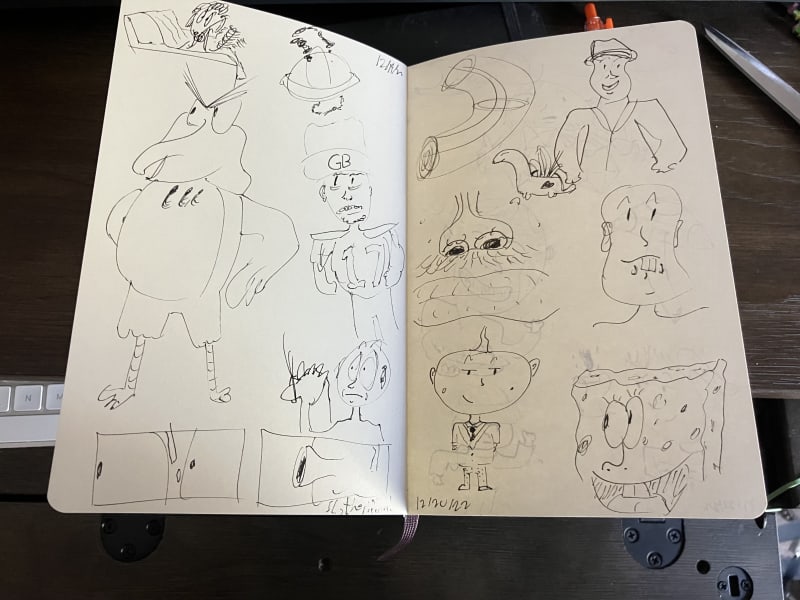
And where I'm leaving this book:
The left page is a study on this painting by Louie Zong.
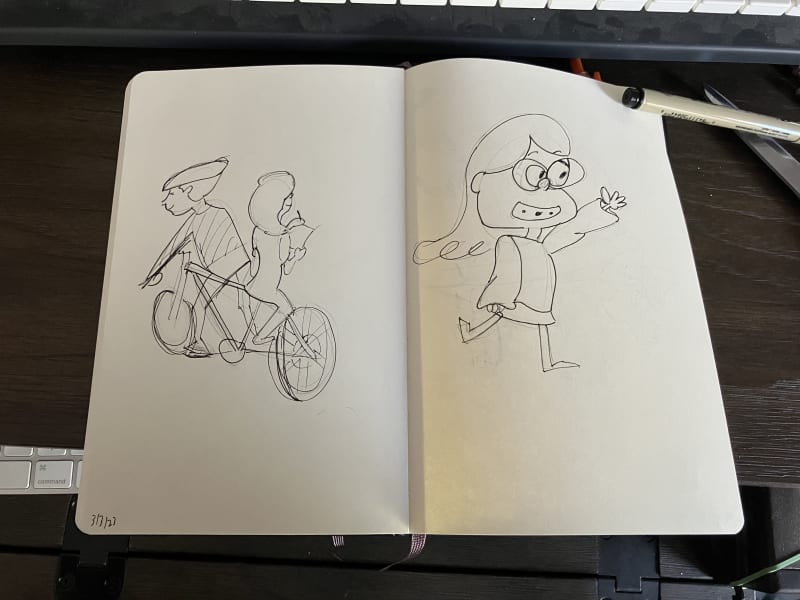
Big change!! I'm taking less time to get many ideas out at once, and am trying more to methodically get out a detailed character on the page. That tracks for this book!
Here's my favorite page, following Miranda and I's trip to Denver:
On to the next one!
Faber - Chanson
Pretty little tune. ✨
According to these books, I'm about to go from a level four pianist to a level five! 💪😂
Writing Music is Just Problem Solving
Writing music is actually just problem solving.
There are folks on both sides of the left and right brain spectrum as far as music making goes. Free form jazz is on the right brain side. Schoenberg's 12 tone school is on the left side.
Most of it is actually somewhere in the middle, though.
The ideas may come from inspiration or from influence. It starts with "I want to write a melody in a Medieval Style." But then, the next statement is "Let me figure out how to do that!"
And it goes on from there:
The fun part is it starts pretty broad and loose, but then gets very technical through the project.
For me, the hardest part of writing is getting started. Blank canvas syndrome. Once a piece is in motion, though, then it's just solving particular musical and emotional challenges along the way.
From there, the tune is taking shape, you're getting more limitations, those limitations bread further creativity, and eventually you stop because adding any more takes away from the spirit of the piece. Time to go on to the next problem - writing another one.
In my mind, this doesn't cheapen the spiritual nature of music making or the mystique of writing music. It's both. When stuck trying to pull a melody out of the materials, eventually there's something that comes out of nowhere to fill in the gap. That's still a part of it too.
I think it's helpful to dispel the belief that it's talent or a gift to do the whole music writing thing, though. Much of it is a lot more on the ground and just working in the dirt than it's given credit, like any creative art.
(Also worth saying, in my experience, the process of writing music is WILDY SIMILAR to writing software.)
Software is Measurably Valuable Creation
Last year I read Chad Fowler's The Passionate Programmer, and I still think a lot about these lines from his ending essay:
You could have chosen any number of career paths, but this one is exciting. It's creative. It requires deep thinking and rewards you with a sense of being bale to do something that most of the people you meet each day can't imagine being able to do. We may worry about progressing to the next level, making an impact, or gaining respect from our co-workers or our peers in the industry, but if you really stop to think about it, we've got it really good.
Here's what really sticks with me:
Software development is both challenging and rewarding. It's creative like an art-form, but (unlike art) it provides concrete, measurable value.
It rings true. It doesn't feel like music, art, writing, and software are all that separate. They're all simply different mediums for creation. Funnily, in my experience, they all have similar rhythms when it comes to starting a project to completing it. Thankfully, too, when one feels stagnant, it's easy to jump to another one. Stirring a boiling pot, waiting for the other one to simmer.
The wonderful thing about software is that it is a concrete service. It's difficult to really pin down the value of art. That doesn't dilute art's true importance and value. That might, in fact, be why music and art are wildly valuable. It's an act of awe and wonder, and you can't measure that.
What a fantastic creative balance, though, that software is a practice that allows you to directly create something to improve the lives of any number of people.
Early on in my current role, I met with teammates who walked up to me, shook my hand, and said "WOW, the kanban feature you developed makes my life SO MUCH easier! Thank you!"
I'm convinced that, in a wholly creative life, our practices need both sides. We need that which is directly beneficial to people, and that which entangles with the spirit of discovery and sensitivity. And I'm thankful for software as the form that balances exploration.
Here's the opening quote on Chad's essay:
But I say to you that when you work you fulfill a part of earth's furthest dream, assigned to you when that dream was born, and in keeping yourself with labour, you are in truth loving life, and to love life through labour is to be intimate with life's inmost secret. — Kahlil Gibran, The Prophet
Writing is Efficient Creativity
I still think regularly about Walt Stanchfield's equation: "Impression minus expression equals depression."
For me, I've wrestled with what that looks like. All the quirky projects I have going on — art, music, software — generally stem from the idea of taking in what I love and pouring it back out into the world.
Producing something to share daily is tough, though.
Writing music is not fast. At least for me. It takes design, sculpting melodies, mucking with synth settings, sometimes practicing an acoustic instrument to get there, and recording multiple takes. Don't get me wrong, it's fun, but it's not a very immediate mode of expression outside of improvising.
I picked up art partly because I wanted a quicker means at communication. A line can be expressive. Sketches take only a few minutes in a day to get out. But WOOPS! After a few months of rough doodles, I'm hungry to build my craftsmanship and do some serious study. So there are still expressive elements, but the full spectrum is on the other side of some devoted practice. I'm just too much of a beginner here.
Blogging, though!
Writing is simply efficient creativity. Essays in any other form take a lot of time: videos take producing and equipment, podcasts take coordinating and editing, speaking takes an audience.
Writing is a straight shot from imagination to publication. It's also the most flexible medium - you can write technical articles one day, life posts another, highly sensory poetry and non-fiction essays the next day. All of this is augmentable with links, images, sound, and video.
And, writing is a terrific way to turn the process of all other art forms into creative pieces themselves.
Software takes a long time to write, too. But sharing a bit about what I learned along the way helps keep my spirit in motion.
I've been searching for a creative practice that can be shared daily, and maybe writing is it. Writing is a great sustainer while other dishes are still in the oven.
I'm tempted to say maybe this only applies to me, but the truth is we're all virtuosos of our own way of speaking and communicating. Writing is an expressive medium that we all have access to.
So if you have something to say — I know you do! — then come hang!
The Gist on Docker
"As for me, I am tormented with an everlasting itch for things remote. I love to sail forbidden seas, and land on barbarous coasts." - Herman Melville, Moby Dick
We're learning about Docker this week at work! 🐳
Here's what I can tell you so far:
Why Use it?
Two big reasons:
To the first point: Node versioning can be a hassle. Even if your application isn't reliant on a specific version of node, perhaps an NPM package you are using is. Any difference between your environment and your hosts could lead to strange issues.
To the second: swapping between local versions of node or python can also be tricky. And then say you start working on an app where you need to download a specific version. All doable, but Docker can make this smoother.
Hosts Handle This Usually
To run your server on another machine, if you were to do it yourself, you would need:
Vercel, Netlify, Render, even AWS essentially eliminate all the steps except for the third one. You simply send your files up, and these services will take care of the rest in most cases successfully.
When you need greater flexibility, or your application is more complicated and fussy with it's versioning, Docker can be the tool to reach for.
Image? Container?
A Container is a lighter version of a Virtual Machine.
A virtual machine is what it sounds like. On a computer, you can simulate a full blown PC by using the hardware on the one you're running it on. Think using Bootcamp to run Windows on a Mac.
A container is a level lower than that. Containers will share the same OS, but will still have separate, self contained resources and file directories. I can have two different containers running different versions of node.
An image is the recipe for a specific container's environment. Docker takes an image and creates a container with the given OS, runtime environment, packages, and environment variables. You'll set all this up in a Dockerfile in your application.
The Haps - March 2023
Valentines, Galentines, and Palentines! February was an A+ month! The grooves are tracked and I'm in them for code, music, art, and people.
Blogging & Dev
I'm getting the hand of this blogging daily thing! Lots of tech journals this month from learning testing in React.
Continuing on with the Tailwind redesigns at work! It's been coming along nicely. 👌 We'll be learning Docker at work, so I'm reading up on great quotes from Moby Dick. 🐳
I went to my first meetup in a while! React Dallas was a great hang. There's a really welcoming and smart community out here!
Music
I released Spring this month! I'm impatiently waiting for it to actually feel like Spring outside!!

Good things coming with guitar and piano! I'm learning finger style on guitar and am plugging away at reading jazz lead sheets on piano.
You can see what I've shared so far through the Music tag on my blog
Drawing

I'm getting close to finishing my second ever sketch book! I'm breaking the threshold of only learning from videos to actually learning through the craft. Like practicing an instrument, the training wheels are coming off and I can just start learning through practice. Exciting!
I'm still doing drawabox. Also going through the brand new Proko Drawing Basics course. Drawabox is so dense an zeroed in on construction that it's great to have a more general, exploratory curriculum with Proko.
You can see what I've made so far through the Art tag on my blog. I'm also sharing drawings on Instagram.
Words and Sounds
📚
🎧
Life
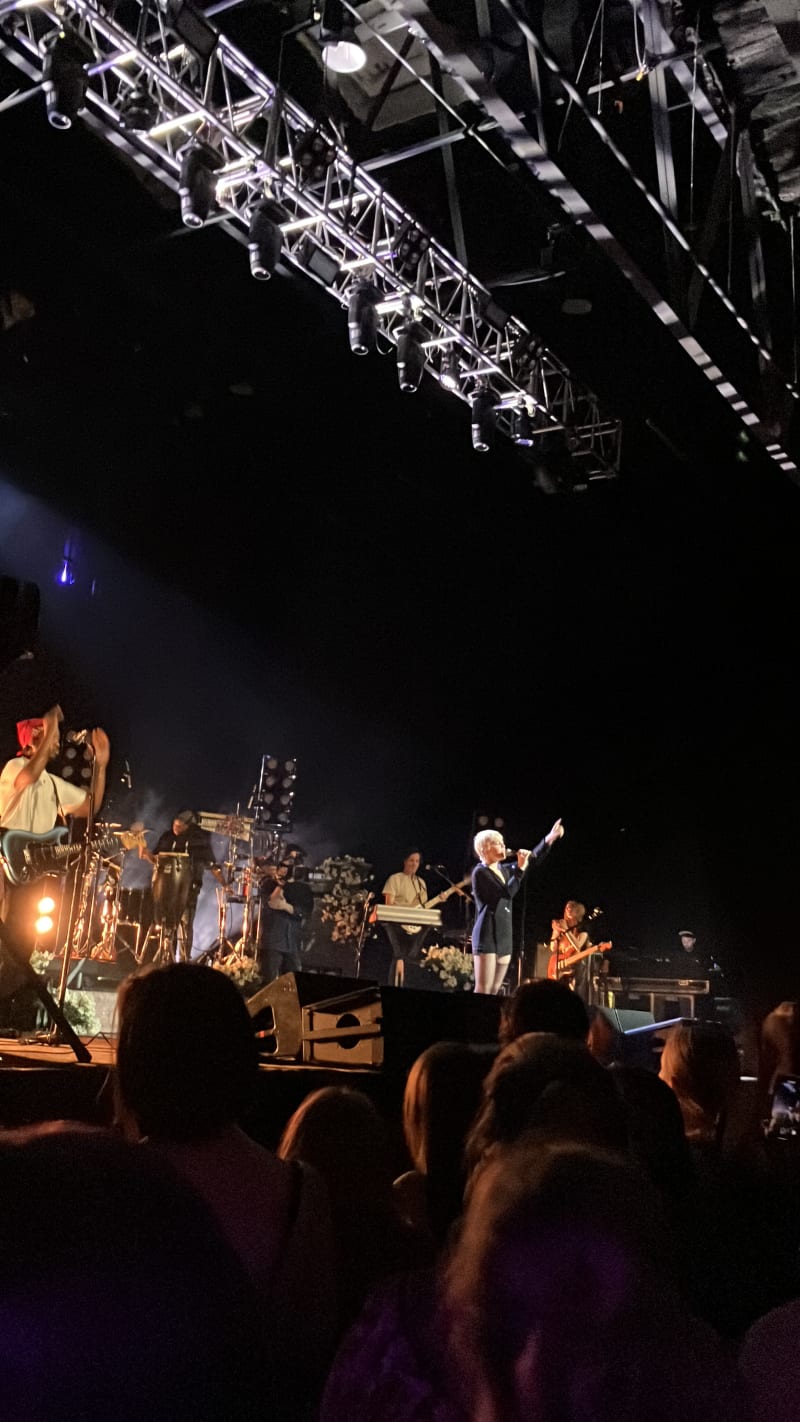
Early this month Miranda and I went to Denver, Colorado for The Gate. IYKYN, we both came back lit up and ready to rock and roll!
Tourist-wise, we got to see the Meow Wolf out there. We loved the original in Santa Fe when we went a couple of years ago. So crazy cool! Can't wait for the Grapevine location to open this summer!
We also saw Maggie Rogers. That concert was a blast! Great band, great crowd, great music.
👋
Louie Zong's Boss Rush & Sketches
Louie Zong's album Boss Rush and the CUSTOM BLENDER RENDERED 3D VIDEO is a gem.
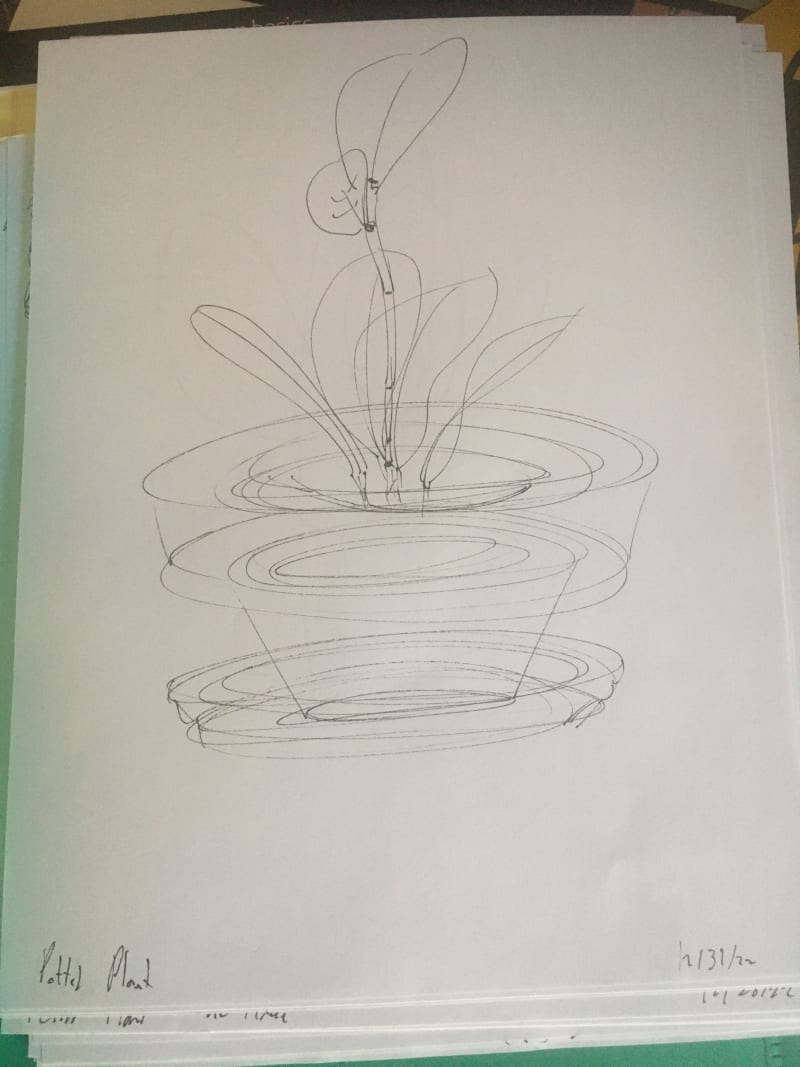
My last bit of plant construction for drawabox!
Faber — Grand Central Station
Big Rhapsody in Blue Vibes with this one. 🌆
Testing and Implementation Details
Redux casts it's vote for the methodology behind React Testing Library.
A key paradigm of React Testing Library is to avoid testing implementation details.
The reason being your users are namely concerned with the app behaving as they expect.
In react, that means not necessarily writing tests that your redux store is what you expect it to be. Instead, it's testing that information is rendering on the page correctly.
I can see the reason why. Implementation details change. Especially in modular systems. We should be able to swap redux out with a means of stage management without having to throw out or refactor our tests. That's twice the refactoring work when all we're concerned about is the app performing as it should be.
At the end of the day, that's more orthogonal.
Implementation Details Are Relative
My example from last time where I'm refactoring my form to elevate a handleSubmit method comes close to being overly concerned with implementation details. As a reminder, here's what that test looked like:
/**
 * @jest-environment jsdom
 */
import React from 'react';
import * as reactRedux from 'react-redux';
import { render, cleanup, waitFor, fireEvent } from '@testing-library/react';
import CartItemForm from '../components/CartItemForm';

test('<CartItemForm />', async () => {
    const rendered = render(
    <CartItemForm
      item={chipsAndGuac}
      itemID={'5feb9e4a351036315ff4588a'}
    />
  );

    ...

  const spiceOptions = await rendered.findAllByTestId('option');
  const firstOption = spiceOptions[0];

  fireEvent.click(firstOption);

  const addItemButtonElm = await rendered.findByTestId('add-item');

  expect(addItemButtonElm.className.includes('selected'));

  fireEvent.click(addItemButtonElm);

  expect(handleSubmit).toBeCalledTimes(1);
  expect(handleSubmit).toBeCalledWith(formExpectedValue);

}
I would argue that this is not necessarily too concerned with implementation details, since the result from a form is a fairly important juncture in the flow of this app. AND I'm not really testing redux here. I'm simply verifying that our onSubmit is getting the information I expect.
However, this integration test is lower on the value scale compared to one where I'm also checking to see if the cart is rendering the correct data afterwards. And that is much closer to what the user is expecting.
Even so, I'm in the clear - if I swap dispatch for an external api, no big deal. I still want to verify that it's getting passed the information I expect. If we swapped the form for a different layout, that's another component entirely, and we wouldn't be able to avoid reworking tests in that case anyway.
A Higher Level of Abstraction
So that's one level of implementation details being disregarded. What about a level higher?
For this app, there's a higher level of abstraction. When it comes to properly updating an item in the cart, then it's important to pull further away from implementation details.
Here my logic is in the redux store, but I don't want to verify the values in the store. That's an implementation detail. I want to verify with what's rendering on the user's cart display is correct.
It's a surprisingly nuanced methodology. I can see why integration testing is a broad portion of the testing spectrum. An appropriate integration test from my last post would not be the same level of abstracted integration test as today's example. And I can see how it's a sweet spot in validating the security of your app. It's the most flexible type of test to give high levels of confidence in different applications and scenarios.
The Sweet Spot
I like to interpret that this is why the "integration part of Kent C. Dodd's testing trophy slopes. The higher up an integration is, the more likely that test will stick around as you swap implementation details, and the closer it is to what the user experience. Therefor, the more useful your test is as a tool for building confidence in the stability of your app.
In my mind, this doesn't negate the benefit of writing tests that are lower on the spectrum. Even unit testing, as a tool for writing modular code, is a pretty sound one.
But it checks out — integration tests sit in the sweet spot.
Testing Encourages Refactoring
I came across hard evidence that testing leads to well designed code this week. Taking the time to test old code is helping me decouple my JavaScript!
I'm using a NextJS E-commerce site as a playground for practicing writing tests. On the site, I have an item order page for each item on a menu. On the page, you can customize the item, select quantity, and then add them to your cart.
The component tree structure looks something like this:
<ItemDisplayPage>
    <CartItemForm>
        <CustomizationDisplay>
        <AddItemToCart>
            <ButtonWithPrice />

        ...
ItemDisplayPage is the page level component, and ButtonWithPrice is the lowest child in this form. Everything else in between handles a spectrum of logic relating to the form.
The Rookie Mistake
This app is a 2-year old project, a portfolio piece written before I was full time in software. So there were some odd design choices.
This is the big one: My onSubmit function was in <ButtonWithPrice/>. Yikes!
  const handleSubmit = (values) => {
    dispatch({
      type: 'ADD_TO_CART',
      payload: {
        ...values,
      },
    });

    router.push('/');
  };
It's doable because, with hooks and global state, I can make that call all the way from the button and it is technically possible.
That very much tightly couples my form logic with the submit button. The button should really only be concerned with rendering price, adjusting quantity, and then firing the handleSubmit method — NOT declaring it, though.
Testing Encourages Refactoring
At the time, it was no big deal. The app worked, tangled as it may have been!
When it came to testing the code, though, doing so was challenging.
I wanted to write an integration test the verifies that, on submit and after some interaction, I'm getting the right data saved to my Redux store. I want to do this from CartItemForm since that's a logical container for all of the interactions and form submission.
Here's a sketch of what that test looked like:
/**
 * @jest-environment jsdom
 */
import React from 'react';
import * as reactRedux from 'react-redux';
import { render, cleanup, waitFor, fireEvent } from '@testing-library/react';
import CartItemForm from '../components/CartItemForm';

test('<CartItemForm />', async () => {
    const rendered = render(
    <CartItemForm
      item={chipsAndGuac}
      itemID={'5feb9e4a351036315ff4588a'}
    />
  );

    ...

  const spiceOptions = await rendered.findAllByTestId('option');
  const firstOption = spiceOptions[0];

  fireEvent.click(firstOption);

  const addItemButtonElm = await rendered.findByTestId('add-item');

  expect(addItemButtonElm.className.includes('selected'));

  fireEvent.click(addItemButtonElm);

  expect(handleSubmit).toBeCalledTimes(1);
  expect(handleSubmit).toBeCalledWith(formExpectedValue);

}
The gist:
With this test written, here's the problem - how do I mock handleSubmit and read the values? I simply can't with the way my component is structured!! I can't drill down and mock from this level. Even if I rendered my button component, the submit method is still within the component and not easily reachable. It has to be extracted in some way.
So, ultimately I moved the handleSubmit declaration up to ItemDisplayPage and prop drilled from there.
That allowed me to mock and pass the mocked handleSubmit method this way:
  const handleSubmit = jest.fn();

  const rendered = render(
    <CartItemForm
      item={chipsAndGuac}
      itemID={'5feb9e4a351036315ff4588a'}
      onSubmit={handleSubmit}
    />
  );
What do I have as a result now?
I can see why there are cultures around testing first. WHen using libraries that fall on the spectrum of being opinionated, it guides your code to being more resilient. The upfront cost of setup is paid off in the long run with easily changeable code.
Testing Organizes Code
Rebecca Murphey has a fantastic. talk on front end testing. It's all done in JQuery, and the principles still apply really nicely to react applications.
My favorite takeaways:
Jest Supports This Systematically
That last point is one I'm coming up against in my own codebase.
This site keeps all it's content in markdown. So I have a looong file with methods for grabing that data:
// api.js

const postsDirectory = join(process.cwd(), '_posts');

export function getPostSlugs() {
  return fs.readdirSync(postsDirectory);
}

export function getPostBySlug(slug, fields = []) {
  const realSlug = slug.replace(/\.md$/, '');
  const fullPath = join(postsDirectory, `${realSlug}.md`);
  if (!fs.existsSync(fullPath)) return false;
  const fileContents = fs.readFileSync(fullPath, 'utf8');
  const { data, content } = matter(fileContents);

  const items = {};

  // Ensure only the minimal needed data is exposed
  fields.forEach((field) => {
    if (field === 'slug') {
      items[field] = realSlug;
    }
    if (field === 'content') {
      items[field] = content;
    }

    if (typeof data[field] !== 'undefined') {
      items[field] = data[field];
    }
  });

  return items;
}

export function getAllPosts(fields = [], options = {}) {
  const slugs = getPostSlugs();
  let posts = slugs
    .map((slug) => getPostBySlug(slug, fields))
    // Filter false values (.DS_STORE)
    .filter((post) => post)
    // sort posts by date in descending order
    .sort((post1, post2) => (post1.date > post2.date ? -1 : 1));

  if (options.filter) {
    posts = posts.filter(options.filter);
  }

  if (options.limit) {
    posts = posts.slice(0, options.limit);
  }

  return posts;
}

. . .
If I wanted to test getAllPosts, this is already difficult on a file-organization level. I can't very well mock the method getPostSlugs because with Jest you can only mock external packages.
I suppose this, in practice, isn't a terribly tight coupling. They are separate methods. But it has already illuminated an opportunity to break up this file to more closely follow a MVC model of organization. A strange paradigm to take on with the absence of a database here, but taking a step towards it lends to the first point at the top of this post - we get clarity in expectations of how this app is working. A big win already.